In this article, we are going to have an overview of how to configure a Spark NLP for a Healthcare project in a cluster that will go from zero (for example, a PoC) to hero (a production-ready environment). This will cover the following sections:
- Creating Spark clusters: single-node (PoC) and multi-node (production purposes)
- How to scale in on-premises installations and cloud providers installations
- From zero to hero: how to scale from a PoC to a production-ready environment
Creating a Spark Cluster
Apache Spark™ is a multi-language engine for executing data engineering, data science, and machine learning on single-node machines or clusters.
A Spark Cluster can consist just of one node, what we call the “Driver” node, or we can add Workers to that node and create a distributed infrastructure for parallel processing, as shown in the following picture:
Driver node (left) and worker nodes (right) in Spark
A POC on a single-node cluster
As shown in the following illustration from Azure Databricks, the simplest way to run a Spark Cluster is just by using a single node cluster (just the driver node). This way, you won’t leverage the distributed computing of Spark Clusters, but it will be enough to test our products, such as Spark NLP, Spark natural language processing for Healthcare, or Spark OCR, for small datasets.
Differences between a Single-node and a Multi-node cluster
You can easily run PoC in single-node clusters using:
- Google colab
- In most Unix-based operating systems using Python
- On premises in Scala or Java
- In Kaggle
- In a Docker Container
- Amazon Linux, Windows
- In air-gappedenvironments
Once you have successfully validated your Proof of Concept and you want to make the leap to production, you will need to move to Multi-node clusters.
Production-ready multi-node clusters
There are different ways you can create a Spark cluster, depending on the infrastructure:
- On premises (Standalone, Yarn, Kubernetes)
- On cloud providers, using MapReduce environments (AWS EMR, Azure HDInsight, Google Dataproc)
- On cloud providers, using Databricks (a dedicated web platform to create and deploy at scale Spark-based solutions)
Let’s take a look at them one by one.
Creating a Spark Cluster “On Premises”
Creating a Spark “On premises” means configuring a Spark Cluster on different physical machines an organization may have or purchase. To do that, we need, as shown in the Driver and Worker picture before:
- a Master Node;
- a Cluster Manager;
- Worker Nodes;
Before going forward, let’s see an example of the simplest (but less scalable) way to create a Spark Cluster, that is using the Standalone Cluster Management included by default with Spark.
If you have available several machines connected to the same local network, you just need to:
Configure which one will be the Master node and, logging into them, run:
spark/sbin/start-master.sh
Then, log in to each node and execute the workers. You will need to point to the Master URL to connect everything together:
./sbin/start-worker.sh <master-spark-URL>
Spark comes with a UI called Spark UI. It’s deployed in the Master node, and you can access it, if in the Master Node, open the URL localhost:8080 (or any other port you can configure, in our case, it was localhost:7077)
 Spark UI showing the Spark Cluster screen
How to scale
Using an on premises, the standalone configuration of the cluster, you need to manually:
- Allocate the proper infrastructure (machines) to run the master and the workers;
- Every time you need to scale, you need to add a new worker and run ./sbin/start-worker.sh <master-spark-URL>;
Advantages
- Easy to have a running basic installationand understand how Spark clusters work
Disadvantages
- Cluster configuration in terms of resource management(memory, disk, etc) is required;
- You need to manually allocate the infrastructure(nodes);
Although the creation of a cluster by itself is simple, it’s complex to manage. That’s why several Cluster Manager types are proposed, to prevent a manual installation.
A more intelligent Cluster Management in Production
The system currently supports several other cluster managers, in addition to the manual Standalone described before, that will help in the optimization of resources allocation:
- Hadoop YARN— the resource manager in Hadoop 2.
- Kubernetes— an open-source system for automating deployment, scaling, and management of containerized applications.
Let’s take a look at both of them.
Creating a Spark Cluster “On Premises” with Hadoop Yarn
As stated here…
YARN is a generic resource-management framework for distributed workloads; in other words, a cluster-level operating system.
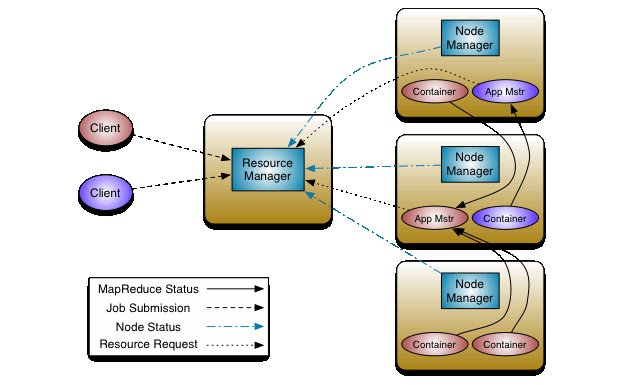
YARN has a Resource Manager who can transparently manage for us the distribution of the workload in our cluster. In Cluster mode, an Application Master, running in a YARN container, and the Workers are also running in Yarn Containers, supervised by a YARN NodeManager. The container for the Master node interacts with the Yarn Resource Manager which, at the same time, asks the Yarn NodeManager for the best YARN containers to run the Spark App.
Spark Cluster managed by YARN
The Resource Manager asks the Node Manager which containers are running, what is their workload, to choose the best to run the application.
Resource Manager interacting with Node Manager
This results in a much more intelligent and transparent way of managing your clusters, compared to the Standalone cluster management, which was totally manual.
How to scale
YARN runs on top of Hadoop, so to create a YARN cluster, you need to follow the steps and create first a Hadoop cluster, and then run YARN on it, as described here.
Advantages
- Running Spark Apps in a YARN cluster is a way to manage the resources intelligentlyin an operating-system fashion, where you have a Resource Planner deciding to which container should Spark Apps go.
Disadvantages
- Its configuration is complex, requiring Hadoop technical skills
- Still requires manually allocate infrastructure
SPOILER: Using Cloud Providers, as AWS EMR that uses Yarn as the Cluster Manager, you can simplify to maximum the management of those configuration steps and, in addition to that, achieve scalability by adding EC2 machines on demand.
Creating a Spark Cluster “On Premises” with Kubernetes
 Spark Cluster managed by Kubernetes
Spark clusters can be managed by Kubernetes, as stated in the Spark official documentation, available here.
The difference between this approach and YARN is that the Driver and all Executors (Worker nodes) are run inside Kuberneted pods, instead of a YARN container:
- Spark creates a Spark driver running within a Kubernetes pod.
- The driver creates executors which are also running within Kubernetes pods and connects to them and execute application code.
Instead of YARN, it’s Kubernetes who handles the driver and executor pod scheduling.
Kubernetes works with Docker images, so you need your Spark NLP, Spark NLP for Healthcare, and/or Spark OCR app dockerized. You can find an official Docker Image of Spark NLP here, and also how to run that image in Openshift (a Redhat industry-ready version of Kubernetes), as shown here.
You can take a look at how to configure a Spark Cluster on Kubernetes here.
How to scale
Scaling in Kubernetes is easier since you just need to provide the Docker Images you want to do and then, from the Kubernetes UI tools, instantiate containers (pods) of your application. The Kubernetes UI tools can help you monitorize the resource management:
 Example of Kubernetes UI tools
Again, one node will be the Master Node, and he rest the Executors. Here is an example of how you can submit a .jar application to be run inside a Kubernetes cluster, managed by Spark
spark/bin/spark-submit \
–master k8s://https://<k8s-apiserver-host>:<k8s-apiserver-port>
–deploy-mode cluster \
–name spark-pi \
–class org.apache.spark.examples.SparkPi \
–conf spark.executor.instances=5 \
–conf spark.kubernetes.container.image=<spark-image> \
local:///path/to/examples.jar
Advantages
- Intelligent management of resources
- Dockerized apps
- Ability to spin up / down pods
- Use Kubernetes UI tools or command line to operate with pods
Disadvantages
- Still requires to install of a Kubernetes cluster on premises, manually managing the infrastructure
Cloud providers: A more scalable Cluster Management in Production
All the approaches before had in common one caveat: as they are “on premises” installations, you need to manually manage your infrastructure:
- Provide with the required machines;
- Connect nodes to a local network;
- Configure your Standalone cluster, your Yarn/Hadoop cluster, or your Kubernetes cluster.
All of this can be avoided by using Cloud Providers, that provide both the Cluster Configuration and the Infrastructure required. Let’s take a look at one example: AWS EMR.
AWS EMR
 AWS EMR logo
Using Cloud Providers, as stated before, is the best way to manage your clusters and provide infrastructure, in the same place. The cost is usually bigger and you may require to have air-gapped configurations to guarrantee higher security measures, but definitely, it’s an option to consider.
EMR cluster using infrastructure from EC2
Configuring a Cluster in EMR requires some configuration steps (security, access, Spark Configuration, Hardware), but after the creation wizard, you come up with a cluster that looks like this…
 Created cluster in EMR
And has a Spark cluster managed by YARN installed. You can easily change the Spark Session parameters in the Configurations tab, including the SPark NLP for Healthcare or Spark OCR licenses…
Spark Session with variables required for running Spark NLP for Healthcare
…and all the infrastructure where your Master and Worker nodes will operate:
EC2 machines, Scaling and Auto-termination policies
SPOILER: You can have Jupyter or Zeppelin running on your EMR cluster, and have a minimal infrastructure to do a PoC first, and then scale or set autoscaling of your infrastructure to make the leap to Production. See more details below.
How to scale
With EMR it’s very easy to scale — in the Hardware tab shown above, add or remove more EC2 machines to the cluster. Alternatively, you can set up Cluster Scaling policies.
Advantages
- Automatic installation of Hadoop and YARN
- Easy configuration using the EMR interface and installation guide
- Autoscaling, autotermination
- You can include Jupyter Hub or Zeppelin to create your apps
Disadvantages
- EMR still needs some knowledge of sysops for configuring the VPC, security measures, accessing the Master node to set several permissions, etc.
- More costly than on-premises installations
- For being a cloud environment, it requires additional configurations to guarantee the security
Databricks: the easiest way to go
 Databricks logo
Databricks is, as described before, a Spark-based infrastructure provider. It’s offered by the main Cloud Providers (Azure, AWS, GCP) as well as a standalone webapp.
As with EMR, it allows to create and configure Spark Clusters, autoscaling, and autotermination policies, using the Databricks Compute. Also, it provides Notebook functionalities, so you can create your apps directly in the same framework.
Compute — Create Cluster screen
How to scale
With Databricks, it’s very easy to scale. You can either enable autoscaling or properly configure the Min and Max workers (see image above).
With EMR you can select which EC2 machines you want to add to the cluster. With Dabricks, you also have the option to choose the proper infrastructure for Workers and the Driver.
Advantages
- Automatic cluster installation
- Very easy cluster configuration
- Autoscaling, autotermination
- Jupyter-based notebook capabilities for both Python and Scala
- Includes Spark SQL, Spark Tables, integration with MLFlow, etc.
- Easy intallation of libraries and jars
Disadvantages
- More costly than on-premises installations
- For being a cloud environment, it requires additional configurations to guarantee the security
From zero to hero: how to scale from a PoC to a production-ready environment
Photo by SpaceX on Unsplash
We have described several possible options about how to use single-mode clusters to test our PoC and also multi-node enviroments to run in production.
But let’s suppose I’m testing Spark NLP for Healthcare. I’m carrying out a PoC that is being successful, and I want to start planning the migration process to Production, or at least start thinking about it. What are the easiest ways to go? Let’s take a look at them, from the easiest to the least easy one.
- Autoscaling with Cloud Providers
Cloud providers, and especially Databricks, can help you autoscale your cluster. You can just start with a Single node for your PoC, and as your use case grows, increase your cluster size or enable autoscaling, to adapt your capabilities to your requirements.
To do that, enable Autoscaling as described above, start with a single node for your PoC, and enable autoscaling when you are ready to make the leap to production.
- Scaling manually with infrastructure provision with Cloud Providers
If you want to have strict control over your cost, you may not want to use autoscaling.
However, Cloud Providers are still the best option, since you only need to:
- Create a new machine, for example, an EC2 in AWS.
- Add that machine to the cluster, using EMR UI (as described above).
If your PoC cluster has a Master and a Worker in 2 EC2 machines (as by default), add manually your machines using the Hardware tab in EMR to add new machines.
- Manual infrastructure provision
This should be the last option since it requires:
- Manually adding or removing machines to the cluster;
- Changing the configuration of the cluster as it grows;
- Having mechanisms for replace nodes that may have eventual fail;
- Changing the Spark Session to reflect all the previous points;
Spark Session and Spark UI
Make sure you are familiar with the Spark Session Configuration parameters, since you may need to also optimize resource consumption, number of workers, default partitions, etc.
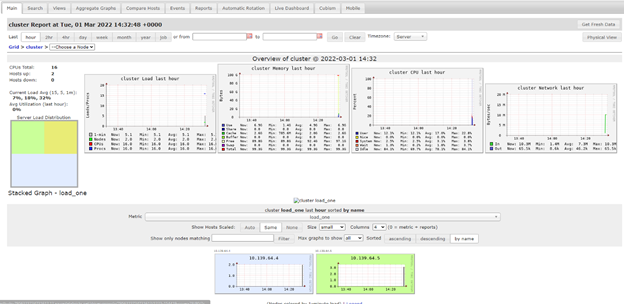
The Spark UI and opensource apps such as Ganglia can help you monitorize what is the workload of your nodes. This may help you to understand what is the optimal configuration, the repartitions you need, etc.
 Ganglia UI on Databricks
How Spark distributes the workload
As explained before, a Spark cluster consists of a Master node (Driver) and some Workers (running Executors). It’s the Driver node the one in charge of distributing the load among the Executors. This means that every driver has a head node load balancing component, and you don’t need to care about having load balancers yourself.
Several users sending requests to a Spark Cluster
In cluster mode, the Driver is usually an independent machine and does not allocate executors to it. This means that the Driver does not run the Spark Task.
In comparison, in single-node enviroments, one node has both a driver and workers.
Serving Spark NLP via API
We have a series of articles describing how to serve Spark NLP clusters using a Rest API.
Both using SynapseML, Databricks Jobs API and MLFlow serve will allow you to attend HTTP requests from an API for using Spark NLP models. Again, a head node load balancer will receive the petitions and manage the queue and distribution of the workload among the workers.
Different users requesting to run different pipelines via API
About LightPipelines
Sometimes, especially for PoC or just in case you want to optimize performance when running SparkNLP on datasets that don’t require distribution, you may want to use LightPipelines.
LightPipelines will execute all the code in a single node, which removes the latency of distributing the data to and from the workers and improves performance.
You provide examples of serving LightPipelines using FastAPI in our Spark NLP for Healthcare documentation.
Other ways to submit tasks to a cluster
Rest APIs are not the only way you can use them to submit tasks. In fact, the classical way to do so is using spark-submit:
The spark-submit script in Spark’s bin directory is used to launch applications on a cluster. It can use all of Spark’s supported cluster managers through a uniform interface so you don’t have to configure your application, especially for each one.
As mentioned above, spark-submit is another way to programatically launch applications in Spark Clusters, including Yarn or Kubernetes-based clusters (see above).
Annex 1: a decision flowchart
Are you following the autoscaling path, manually scaling using cloud providers, or going for the “on premises” option? Here is a flowchart that summarizes the steps described above.
A decision workflow: some questions you may want to consider before taking any decision
Annex 2: how different serving mechanisms distribute the load
Putting all the pieces together: this is how a user launches Spark NLP apps (using API or spark-submit), how they are queued and managed by the Head Node Load Balancer, installed in the Driver, and how the Driver transparently distributes the workload over the workers.


 Spark UI showing the Spark Cluster screen

 Spark Cluster managed by Kubernetes
 Example of Kubernetes UI tools
 AWS EMR logo
 Created cluster in EMR


 Ganglia UI on Databricks


